Operation and calibration of Potentiometric and karl fisher titrator
1.0 Purpose
1.1 To describe a procedure for operation and calibration of Potentiometric Titrator.
2.0 Scope
2.1 This procedure is applicable for operation calibration of Potentiometric Titrator located at Instrument room in
Quality control department at ABC Pvt. Ltd., Roorkee (UK), India.
3.0 Responsibility
Officer QC/ Executive QC Preparation of SOP and follow the procedure as per SOP
Assistant Manager Reviewing and Training of SOP
Manager QC Implementation of SOP
4.0 Accountability
4.1 Manager Quality Control is accountable for implementation and compliance with SOP.
5.0 Procedure
5.1 Operation
5.1.1 Ensure that the working place is clean.
5.1.2 Spilled chemicals and solvents must be remove immediately.
5.1.3 Handle the electrode with carefully.
5.1.4 Silica should be always in brown condition.
5.1.5 Add the samples carefully to avoid spreading on outer surface and sticking.
5.1.6 The surface of the electrode should not covered by the sample substance. It will be cause incomplete reaction.
5.1.7 Switch on the instrument from main power and then switch on the computer.
5.1.8 Double click on Tiamo 2.3 icon located on desktop.
5.1.9 Enter the User name and Password and then click OK.
5.1.10 Home screen will open having 5 icons.
i) Work Place, ii) Database, iii) Method,
iv) Configuration, v) Manual control
5.2 Preparation of Method
5.2.1 For making of new method file click on Method →File → New.
5.2.2 New Method window will open.
5.2.3 Double click on titration and select the desirable titration and click OK.
5.2.4 New Method window will open.
5.2.5 Feed all the parameters and calculation as desired.
5.2.6 After completion of making of new method, save the new method by click on
File → save and enter the File name and click OK.
5.3 Performing for Aqueous /Non Aqueous Titration Analysis
5.3.1 Go to Workplace run window select the desired method from method table which are already created and saved.
5.3.2 Select the electrode as per the application and connected with instrument.
5.3.3 Take glacial acetic acid 100 ml of beaker and put the beaker on titration platform.
5.3.4 Fill the dosing unit by click on Manual → Dosing device.
5.3.5 Then click on Prepare → Start.
5.3.6 After filling of doses unit click on Workplace click the Start key and add the sample.
5.3.7 Fill the Data and click OK system will start the titration.
5.3.8 After completion of run, the report can be seen in on report window in workplace.
5.3.9 The Data will be save in the Database.
5.3.10 Take the print out from Database, File → open → select the Database to be open.
5.3.11 Select the Data to be Print.
5.3.12 File → Print → Report → Select the desired Report template and take a print.
5.3.13 Record all the activity in Potentiometric Titrator Log Book.
5.4 Performing for Karl Fisher Titrator Analysis
5.4.1 Connect the KF device with instrument.
5.4.2 Go to Workplace run window select the desired method from method table which are already created and saved.
5.4.3 Remove the waste solution from the titration vessel by pressing ͜↑ present on the titration stand
and fill the fresh methanol by pressing ͜↓ present on the titration stand in the titration vessel to dip the electrode.
5.4.4 Fill the dosing unit with K.F. reagent by click on manual → dosing device → dosing device.
5.4.5 Click on Prepare and then click on Start.
5.4.6 After filling the dosing Unit click on Workplace.
5.4.7 Click on Start, now methanol starts neutralizing, while neutralizing “Conditioning not ok” will display on screen.
5.4.8 Once the methanol neutralize “Conditioning ok” will display.
5.4.9 Click the Start key and quickly add approximately 35 mg of water.
5.4.10 Feed the water weight click OK and then click continue.
5.4.11 “Conditioning ok” will display after neutralization of water.
5.4.12 Repeat the step 5.4.9 to 5.4.11 as same for two more factor.
5.4.13 Record all the activity in Karl Fisher Titrator Log Book.
5.5 Calibration (Frequency: after 12 Months)
5.5.1 pH Electrode calibration (for Aqueous)
5.5.1.1 Operate the instrument as per procedure mentioned in the point no. 5.1
5.5.1.2 Ensure that the pH electrode is connected.
5.5.1.3 Immerse the electrode in the first buffer i.e. pH-4.01.
5.5.1.4 Start the calibration by click on “START”.
5.5.1.5 After calibration the first buffer, the massage will appear for changing the buffer.
5.5.1.6 Follow the step 5.5.1.3 to 5.5.1.5 for pH- 7.00 and pH- 9.00 calibrations respectively.
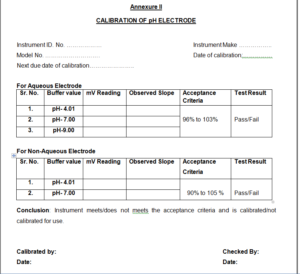
5.5.1.7 Record all the data in calibration of pH Electrode as per format Annexure II.
5.5.1.8 Acceptance criteria:- Relative Slope- 96% to 103%.
5.5.2 pH Electrode calibration (for None Aqueous)
5.5.2.1 Operate the instrument as per procedure mentioned in the point no. 6.1
5.5.2.2 Ensure that the pH electrode is connected.
5.5.2.3 Immerse the electrode in the first buffer i.e. pH-4.01
5.5.2.4 Start the calibration by click on “START”.
5.5.2.5 After calibration the first buffer, the massage will appear for changing the buffer.
5.5.2.6 Follow the step 5.5.1.3 to 5.5.1.5 for pH- 7.00.
5.5.2.7 Record all the data in calibration of pH Electrode as per format Annexure II.
5.5.2.8 Acceptance criteria:- Relative Slope- 90% to 105%.
5.5.3 Calibration of Dosing Unit.
5.5.3.1 Operate the instrument as per procedure mentioned in the point no. 6.1
5.5.3.2 Fill the purified water (previously measure temperature) in the bottle and fix the dosing unit on the bottle.
5.5.3.3 Ensure that there is no bobble in the burette and tubes.
5.5.3.4 Click on the manual followed by dosing device of 888_1 titrando.
5.5.3.5 Click on “Add fix volume” than manually enter the volume in Ml than click “Start”.
5.5.3.6 Collect the water in dry, tared beaker and weigh the dispensed quantity on an analytical
balance. Repeat the operation for two times more.
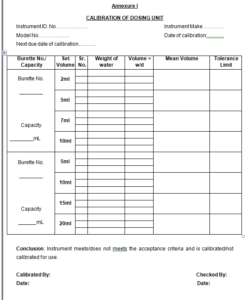
5.5.3.7 Calibrate the Dosing Units as below mentioned volumes.
1) 10 mL Dosing Unit:- 2mL, 5mL, 7mL and 10mL.
2) 20mL Dosing Unit:- 5mL, 10mL,15mL and 20mL
5.5.3.8 Record all the data in Calibration of Dosing Unit as per format Annexure I.
5.5.3.9 Acceptance criteria:- The observed volume shall not deviate 0.03mL.
5.5.4 Calibration of Karl Fisher titrator with Disodium Tartrate
5.5.4.1 Operate the instrument as per procedure mentioned in the point no. 6.4
5.5.4.2 Once the methanol neutralize “Conditioning ok” will display
5.5.4.3 Click the Start key and quickly add accurately about 100 mg of Disodium Tartrate into titration vessel.
5.5.4.4 Feed the weight of Disodium tartrate click OK and then click continue.
5.5.4.5 “Conditioning ok” will display after neutralization of water.
5.5.4.6 Repeat the step 5.5.3.3 to 5.5.3.5 as same for two times.
5.5.4.7 The data will be save in database.
5.5.4.8 To take the printout from Database Click on Database then click File/Open /select data to be print.
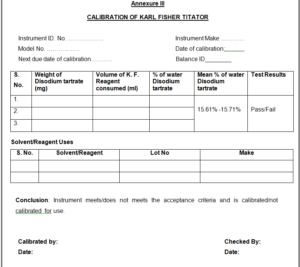
5.5.4.9 Record all the data in Calibration of Karl Fisher Titrator as per format Annexure III.
5.5.4.10 Acceptance criteria:- The percentage of water must be between 15.61 to 15.71 %.
5.6 Cleaning Procedure
5.6.1 Switch OFF from main power supply before cleaning.
5.6.2 Clean the Potentiometric Titrator or connecting cord with the dry cloth.
5.7 Maintenance
5.7.1 Quality Control Manager or his designee informs the Maintenance Department or
service engineer to rectify the defect. Affix ‘Under Maintenance’ label on the instrument.
5.7.2 After completion of maintenance work remove the Under Maintenance label and calibrate the Instrument.
6.0 Reference
In house specification
7.0 Attachments
Annexure-I: Calibration of Dosing Unit
Annexure-II: Calibration of pH Electrode
Annexure-III: Calibration of Karl Fisher Titrator
8.0 Distribution
Distribution of the controlled copy to concerned departments.
Additional copies may be issued for specific purpose.
9.0 Abbreviations
QA : Quality Assurance
QC : Quality Control
SOP : Standard Operating Procedure
K. F. : Karl Fisher
10.0 Revision History
| Revision No. | Supersedes | Effective Date | Details of Revision |
| 01 | Nil | New SOP |
Operating Procedure of Centrifuge
sop for preparation and storage of reagent solution
sop for Calibration and Maintenance of Laboratory Instruments and Equipment
Disposal of Residual Sample or Left Over Material
sop for for Laboratory Incident
standard operating procedure temperature monitoring
sop for operation of infrared moisture balance
sop for preparation of mobile phase
sop for Preparation and Issuance of Analysis protocol standard
sop of placebo and impurity stock solutions
sop for disposal of residual sample
sop for handling of pharmacopoeial changes
sop for procedure for operation of ultrasonic cleaner
difference between UPLC and HPLC
sop for for Emergency Eyewash and Shower
sop for operation and calibration of total organic carbon analyzers
sop for operation of cobb tester
sop for Operation and calibration of atomic absorption spectrophotometer
sop for Operation and calibration of gas liquid chromatograph
sop for operation of humidity oven
sop for operation and calibration of serological water bath
sop for monitoring of drain trap
sop for destruction of analytical samples after testing and control samples
sop for destruction of used chemicals
Sop for Operation of suction pump
sop for Operation and calibration uv cabinet
sop for Operation and calibration of bulk density apparatus
sop for operation and calibration of shore hardness tester
sop for operation of rub proofness tester
sop for monitoring of purified water
sop for Retesting of packaging materials
sop for Retesting and resampling of raw materials
sop for Control of issuance of record of analysis green sheets
sop for Control of computer passwords
sop for sampling of packaging materials PM
Operation and Calibration Procedure for pH Meter
operation and calibration of muffle furnace
Operation and cleaning of centrifuge
Operation and cleaning of sonicator
Operation and calibration of dissolution test apparatus
Operation and cleaning of hot air oven
Operation and calibration of bursting strength
Operating procedure of refrigerator
Operating procedure of stop watch